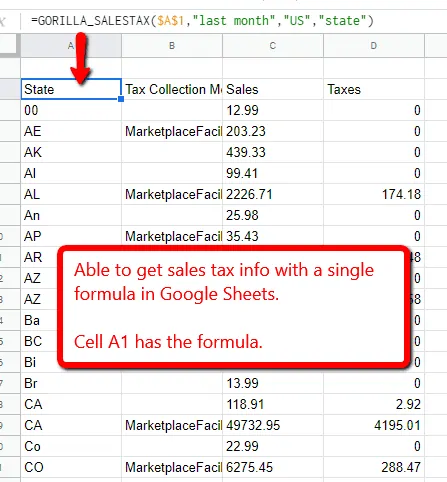
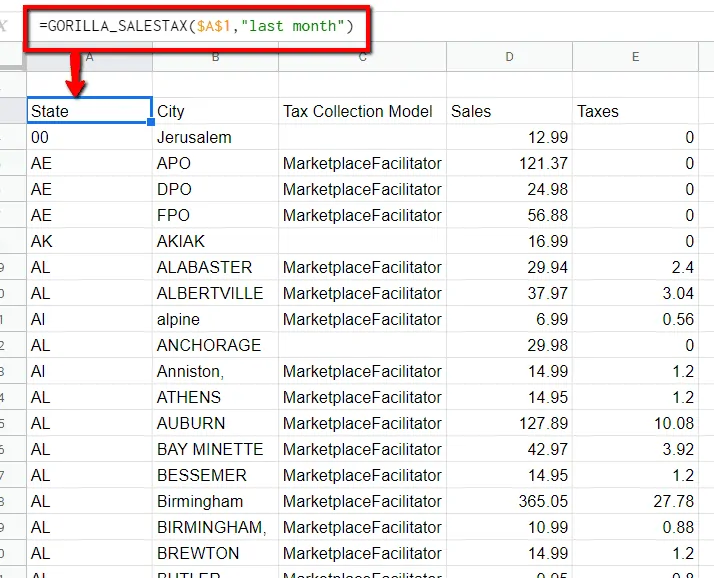
The screenshot above is what you’ll be able to do and make your seller FBA tax calculation easier.
By then end of this Amazon FBA sales tax article, I’m going to show you:
- How you can import your Amazon sales tax data with ease
- Calculate the sales tax amount that has been collected and what you owe
- How much sales tax has been collected by Amazon marketplace facilitator
- How much you have collected and owe the state
- How Amazon pays the sales tax
- Your role in remitting taxes
We have a lot to go through, so let’s begin.
FBA sales tax for Amazon sellers
Now that the Wayfair vs South Dakota dust is settling, it’s obvious that sales tax on Amazon sales is here to stay and you need to be on top of it so that you don’t get a surprise tax bill in the 5 or 6 figures.
Thank goodness, it is much easier with Amazon handling the collection of sales tax and remitting it to the state on your behalf as the marketplace facilitator – something they should have done a long time ago.
Amazon has not implemented the marketplace facilitator system across all 50 states yet, but the trending is going in that direction.
Check to see if your state is listed in Amazon’s marketplace facilitator page. Only the states on the list have sales automatically collected and remitted.
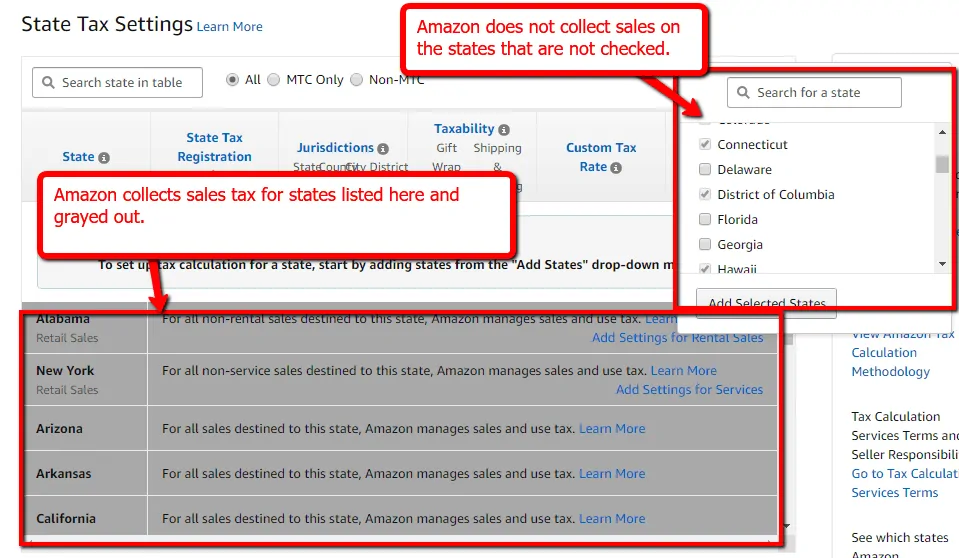
An easier way is to go to your tax settings.
Click the drop down box on the right that says “add states” and then it will open a list of states with check boxes.
The unchecked states are the states that Amazon does not collect sales tax on your behalf.
E.g. New Hampshire is not on the list. This means that for all sales to NH, you’ll have to get the tax info and remit to the state yourself.
Amazon FBA sales tax is going to be the norm across every state your products are sold and shipped to.
The point is that your listings for FBA sales need to have the correct tax code so that you are not under-receiving sales tax. If you’re not collecting the correct amount, you will have to pay the difference out of your own pocket.
Ouch.
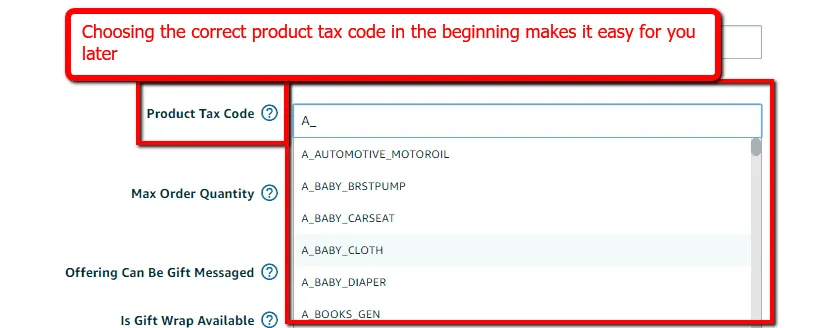
Amazon tax code – select the right one
The full list of Amazon product tax codes is long, overwhelming and confusing.
If you’re a seller, go to this page in your account to see the full list and find the matching product tax code for the item that you sell.
If you don’t have access to a seller account, click here for the full-screen capture of all the product tax codes.
This screenshot is a snippet of the entire list.
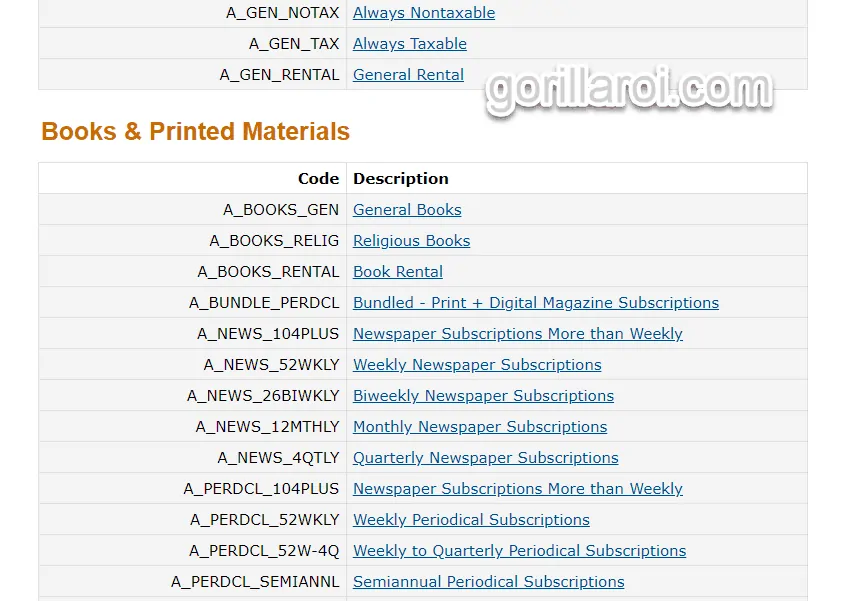
The quickest and easiest way is to select A_GEN_TAX for all of your products. This will classify your product as a general consumable and there are no additional sales tax considerations. This tax rate will cover you safely.
It’s also the safest rate because it’s going to be the highest tax rate. Some products like food, computers and baby goods have lower tax rates.
This means that if you set products in this category to A_GEN_TAX, then you will be collecting more tax than required.
And no, you don’t get to keep it. You must pay it back, but the downside is that other sellers who have the correct product tax code will have a lower “total price” at checkout than you.
With individual product tax codes set up, Amazon will know when and when not to collect the sales tax and the correct amount.
- If you have thousands of items to list, this is a lot of work.
- If you don’t sell in any special categories, set it to A_GEN_TAX.
It’s a one time process when you create the listing, so it is worth the effort to set up correctly.
Product tax codes on handmade items or no barcode products?
If you have a product without a barcode or there is not a special product tax code, then select A_GEN_TAX.
Let’s say you make vases, or ceramics or handmade soaps, then all of this goes under A_GEN_TAX.
A tricky part may be a product that you think is part of the baby category. If you make and sell baby diaper bags, or some accessory related to babies that is not related to anything medicinal, food, cosmetic, goes inside the mouth or body, then it has a very high chance of just being a regular product A_GEN_TAX.
After all, what is the difference between a diaper bag and a regular shoulder bag except for additional pockets?
Does Amazon collect sales tax for sellers
Yes and no.
Amazon will collect sales tax on all products sold to the states shown on your tax settings page.
If a state is not listed, Amazon does not collect sales on your behalf. It is up to you to collect sales tax and remit it to the state. (But this is another topic…)
If you sell in Florida, as of today, Amazon does not have the system set up to collect on your behalf.
Amazon also does not collect sales tax on FBM orders. Only FBA orders.
If you fulfill orders via FBM or even through your ecommerce stores, you will need to keep record of the taxes collected and remit it yourself.
Does Amazon pay sales tax for sellers
This is another yes and no answer and comes up a lot.
Because Amazon only pays on your behalf if they have collected on your behalf. This is why you need to check your tax settings to see which states are being collected on your behalf.
If Amazon does not collect sales tax for Florida, then you will be required to pay to the state of Florida the sales tax you have collected.
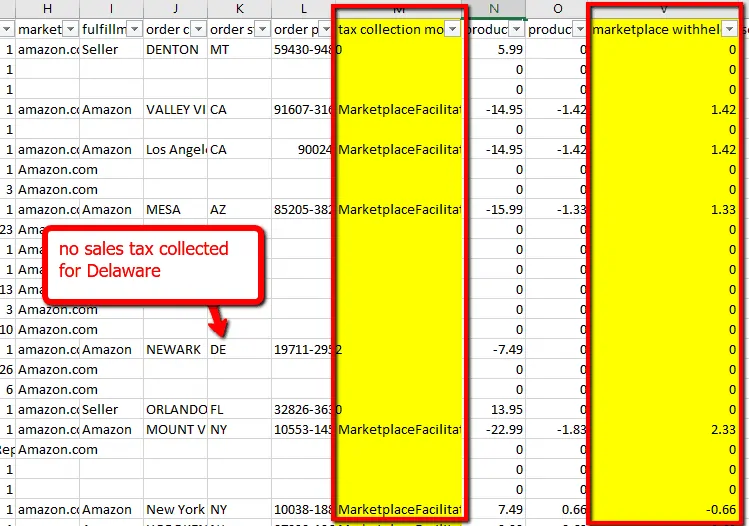
If you go to your transaction report, there is a column that says “tax collection model” and “marketplace withheld tax”.
“Tax collection model” tells you whether Amazon has collected it or not. If Amazon has collected sales tax for you, it has the value “MarketplaceFacilitator”.
The column “marketplace withheld tax” will then show you the amount that Amazon has collected and pays to the state for sellers.
Here’s a screenshot of the report and showing the taxes collected and paid/unpaid which I’ve highlighted yellow.
Estimated tax to be collected Amazon?
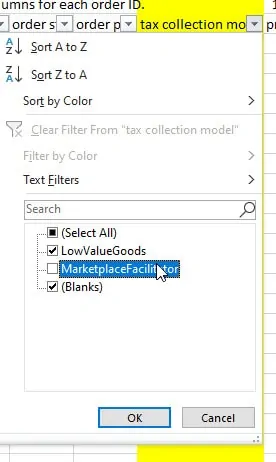
If you follow the screenshot above, and filter for all the orders where it does not say MarketplaceFacilitator in your transaction report, you can easily find out the total amount of sales tax that was not collected.
Since Amazon will pay sales tax that it has collected for your account, you only have to calculate the amount that you owe.
Much simpler.
Here’s how to get your sales tax data from seller central and filter the data.
- Select the entire header row of the table.
- Click on the menu > data > filter
- Click on the drop down icon and then deselect “MarketplaceFacilitator” and click OK.
You will have a list of all the orders where sales tax was not collected.
How to get FBA tax data automatically
If this sounds like too much work – it is.
There is an automatic way that I’ll show you in this section.
However, if you need numbers for accounting purposes and it must be correct to the cent, there is no other way to do it than manually.
No software will be as accurate as generating the transaction report directly from seller central and then going through it yourself as I showed you above.
But what if you want the numbers to prepare yourself and accuracy isn’t so important and having the cash set aside?
This case is different as you are looking for data to show you the health of the business and so you don’t get caught off guard.
Knowing roughly that you’ll owe the state $500 in taxes, and being prepared for it is better than having no idea.
Enter Gorilla ROI
Import sales tax info using Gorilla ROI
GORILLA_SALESTAX()

GORILLA_SALESTAX("LAST MONTH")

GORILLA_SALESTAX("LAST YEAR", "US", "STATE")

GORILLA_SALESTAX("2020", "US", "CITY")
Assuming you have:
- installed the addon and followed the getting started instructions to connect your seller central account
- wait around 24hrs for your data to get imported and calculated
In any Google sheet, start to enter the formula =GORILLA_SALES and you will get this popup showing you how to use the formula.
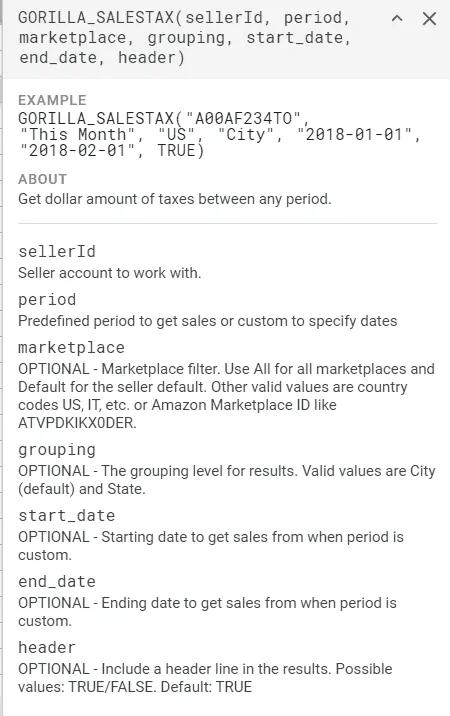
This formula allows you to pull total revenue and the taxes collected by state and city.
If you do something as simple as =GORILLA_SALESTAX(“LAST MONTH”), the result looks something like this.
This single formula is the default display and
- combines your sales
- organizes it into state and city
- shows whether the tax was collected
- shows total sales per city and state
- shows the total tax collected
The above formula without any inputs, other than the time period displays it by default as “city” setting.
If you take it one step further and group it by “state“, it will look like this.
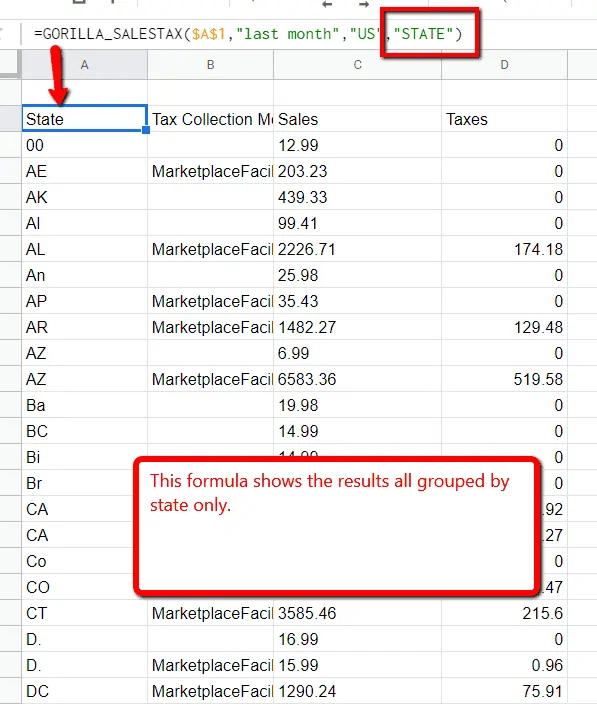
Notice how all the values are now consolidated into states.
This way, you can quickly see how much sales you did per state, and the level of taxes.
WARNING: This is NOT an accounting tool.

Reports are not reconciled for every refund or canceled order. The data is imported at the end of the day. If a customer returns your product later on, we do not go back into history and reconcile transactions continuously. It is not possible.
What are some ways to use this sale tax data?
Please heed the warning above. Depending on your refund rate, you will see differences.
E.g. if your average monthly refund percentage is 4%, then expect the total sales to be off by about 4%. That is because we import your transaction data daily. We do not generate the data when you request it through your sheets. That is only possible for you to do manually through seller central.
- You can see which states have the most sales and you can adjust inventory closer to that region if you use a 3PL.
- You can get a very good estimate of how much sales tax you will owe to the state you are registered in.
- You can use it in your profit and loss statement to get net income as net income is after taxes.
- Make sure that enough tax money is set aside so you don’t get a nasty surprise at the end of the month/quarter/year.
See how automating the data collection process can improve your Amazon FBA business
We have much more data that you can pull using Gorilla ROI addon for Sheets. It’s not just sales and tax data you see here.
You can load your seller data such as:
- Product information
- Your product BSR
- Inventory across marketplaces – instock, inbound, transfer
- Sales data across any period – last month, 2020 Q1, your fiscal year
- Reviews
- Charges and fees for a P&L
You can supercharge any of your existing spreadsheets by data process automated.
Comments
Related Posts

10 Profitable Product Categories for Amazon Affiliates 2025
What you’ll learn Amazon is a favorite for experienced and…
Unlock the Secret to a Profitable Automated Amazon Store: How to Build a Hands-Free Income Stream
Ever dreamed of running a profitable Amazon business while sipping…

Master Amazon New Restricted Keywords: A Seller’s Guide to Success
Changes to Amazon’s restricted keywords list have taken a lot…


Leave a Reply